Thursday, October 23, 2014

Minnie Mouse Makeup Tutorial


Hi ya,
     For the last post in my Last Minute Halloween look, I wanted to show you a quick makeup look that is really simple and doesn't require too much effort, so I thought that a Minnie Mouse tutorial would be perfect for this last look. Minnie Mouse is a super cute character and a great idea for costume parties, because literally, this took me 15-20 minutes to do and is really simple to create. I don't really watch a ton of Mickey Mouse cartoons, so I really only know Minnie Mouse from Kingdom Hearts, but I thought this would be a cute idea. Lets get started, shall we?


1. Base
     I decided to use a cc cream for this look because it'll give my skin a paler luminescent look. I dotted it on my face and blended it out with a sponge.

2. Conceal
     Since my dark circles are really bad right now (thanks so much school :/ ), I'm using an orange-ish toned concealer underneath my eyes to brighten up my face a bit. I just brushed this on, and blended it out with a sponge.

3. Highlight
      To really make this a costumey, I'm taking a liquid highlighter and applying it to the high points of my face and blending it out with a clean foundation brush.

4. Set
     To avoid looking really oily, I went in with a light colored powder and applied it all over my face with a fluffy powder brush.

5. Prime
      Instead of using a primer, I'm using a shimmery white eye pencil all over my lid, and blending it out with my ring finger. Using an eye pencil will help the powder products stand out better.

6. Base
     To keep the eyes more natural looking, I'm using a vanilla toned eyeshadow instead of pure white, cuz it's less harsh than white. I applied this with a fluffy eyeshadow brush to get a stained on look.

7. Shade
     Taking a warm dark brown eyeshadow, I'm applying it in a cut crease shape from my outer v to my crease with a flat, firm eyeshadow brush.

8. Line
     Taking a matte gel type liner, I'm applying this in a dramatic wing. You can honestly make this as thick as you want, I like to keep it about a medium thickness.

9. Lashes
     Last thing for the eyes, is to apply a coat of your favorite volumizing mascara on curled eyelashes. You can opt for falsies if you prefer, but I'm kinda scared of them, so I just coat my lashes really well.

10. Nose
     The nose is super simple. Take a black eyeliner pencil and draw a heart on the tip of your nose. If you want to, you can set the black with a powder to keep it from smudging.

11. Highlight
     To give my nose a cartoonish look, I took that white pencil from earlier and applied it to the top part of the nose. This will make your nose look just like Minnie Mouse's.

12. Conceal
     To give my lips the perfect shape, I'm concealing them so that I can give my lips a smaller shape.

13. Lipstick
     The shape of the lips is really up to you, but I went ahead and applied a bright red lipstick to the center parts of my lips to make them smaller and more cartoon like.

~Finished Look~

~Costume Ideas~


     I hope you all enjoyed this look! Above ^ are some outfit ideas that I thought were super cute, from pinterest. I thought it might help inspire you for this look :) It was sooo much fun to do this look! If you have any questions, leave them for me in the comment section and I'll get back to you ASAP. Love ya'll so much, Muah!
Grace ^.^


Song of this post-
ILYSB- LANY

Memebox Exclusive Offers and Codes!
$5 off purchase of $100 or more :AFFILIATE-7883-D36TF-EPEL
$10 off purchase of $150 or more : AFFILIATE-3488-3X5LC-OOME
October $5 off coupon code: KWWY
*Coupons Expire on 10/31!!!!!*

Saturday, October 11, 2014

60's Bombshell Makeup Tutorial

Hi!
    So, Halloween is coming up, and this year I decide I would do a quick series on last minute costume ideas. Basically, if it's simple and easy to do, it'll make it in this series. I will be posting some of these on YouTube as well, so keep an eye out for those. Anyway, one of the easiest looks is a 60's bombshell look, and I think it took me maybe an hour to get this whole look completed. It's great if you want to wear a costume and celebrate without looking super ridiculous, so it's perfect for any work things. I promise there will be funner tutorials later :) Let's get started!!
~Makeup~              
                                                   

1. Primer
     First, I'm priming my face with an orange toned primer, which is going to help to give your face a healthy look. While orange can be really intimidating, it is great for relieving dull looking skin.

2. Base
     For this look, I'm using 2 different products for my foundation layer. For my T-Zone, I'm using a foundation that is lightweight and about .5 shades lighter than my skintone. For the outer portions of my face, I'm using a BB Cream that is a tinsy bit darker than my actual skin tone. I used my fingers to blend everything in.

3. Conceal
     Taking an orange toned concealer, I'm applying this to my dark circles and to the high points of my face. DO NOT BLEND IN! I'm not kidding, that comes next.

4. Set
     Okay, now you can blend it in with powder on your brush. This will give your face more of an airbrushed finish and will keep your concealer on for longer.

5. Blush
     Taking a lighter berry toned blush, I'm just going to apply it to the hollows on my cheeks with a powder brush. Make sure to be light handed when applying your blush. Looking like an oompa loompa is not the goal of this look.

6. Eye Base
     Instead of using a primer, I'm going to use a cream eyeshadow on my lids up to my crease. This one is a really pretty beige with gold shimmers. I used my ring finger to blend it in. (Please ignore the pen on my finger, I've been doing a ton of school lately).

7. Crease
    For my crease, I'm using a warm brown and really defining the shape of my eye. This is one of the most important steps of this look so make sure you really get a good deep look to your eyes.

8. Highlight
     Taking a vanilla eyeshadow with a firm eyeshadow brush, I'm applying it to my inner corners and browbone. If you want to, you can put a little on the center of your lid.

9. Line
     I'm using a dark loose eyeshadow to line my upper lashline in a wing shape with an angled brush and dragging it down onto my lower lashline. After that, I'm blending it out with fluffier brush to soften the look and make it a little smokier.

10. Tight Line
     Taking a waterproof black eyeliner, I'm applying it to the roots of my lashes. This helps your lashes look fuller and since I don't like to wear falsies, it will help my lashes look a bit more va -va- voom.

11. Wing
     I'm using a matte black gel liner to wing out my upper lash line and winging it out. I didn't wing it like crazy, but you can if you really want to.

12. Lashes
     I'm using a curling mascara to give my lashes that wide eyed Twiggy look. I curled my lashes and then applied to coats on my upper and lower lashes.

13. Lips
    Taking a warm nude lipstick, I'm applying that all over my lips and blending it out with my fingers a little. This will really complete the look, giving it a mod squad feel.

~Hair~
  1. Sweep all your hair to one side of your head. If you want to, you could tease your hair, but I already have pretty voluminous hair, so I opted not to.
  2. Pin your bangs (or the front section of your hair if you don't have bangs) to the side of your head, in a swoop and secure with bobby pins.
  3. Tie a loose and low ponytail to one side of your head, I choose the side with the swoop.
  4. Loop the ponytail into itself by creating a hole with your fingers from the underside of your hair and looping the ponytail through it.
  5. This step is optional, but curl the loose pieces to give it a retro feel.
~Outfit~
     So, if you want to, you could always buy an outfit, but if you're really low on time, take a sweater, white smock and leggings and pair it with a bright pop color of shoes. The black and white will make it look a little more mod squad, and the red shoes will make it look more vintage esque. Of course if you have more time, you could always wear something fancier.

    I hope that you all enjoyed this full look idea. Like I said, it's supposed to be an idea for if you're running late for something, or you are simply a procrastinator ( like me) and need a quick and easy look. Anyway, I'll be uploading more of these throughout the month, so be on the lookout for more Halloween quick and easy tutorials. I'll see you guys soon, make sure to comment down below what your going as for Halloween. Love ya'll! Muah!
Grace

Song of this post:

Crazy in Love (Beyonce Cover)- Daniela Andrade 


Friday, October 3, 2014

Innisfree Super Volcanic Pore Clay Mask Review


Hi!
     I know, we all never thought this day would ever come, but for the first time in about 2 months, I'm finally not doing a makeup tutorial for K-Pop! We had a nice run, but I missed doing reviews soooo much, and when one of my Korean friends, Seulah, got this for me when she went to Korea for the summer, I thought I should share my thoughts on this awesome little guy. I hope you all enjoy!

    So, I've had so many blackheads on my t-zone lately, and my skin has just been getting a lot oilier lately, which I never view as a very good thing. I notice that it happens mainly when the seasons are changing, and it definitely is up where I live. Yeah, I'm talking sweaters, skinny jeans (or jeggings), and boots. To help my skin out and to clear it up a little bit, I decided I would give this mask a try, cause after all, this is one of the most popular face masks in Korea. I totally see why, too.


Packaging~
     The mask comes in a 100% recycled paper box printed with soy ink. I wouldn't say that the box is very sturdy, but unless you collect the boxes things come in (guilty as charged), then it's really not that big of a deal. The product itself comes in a cylinder like jar with a screw on lid. Originally when you open it, there is a plastic lid inside the jar to protect it from any nasty bacterias. I generally like to keep those, because if you travel, it's nice to know that you have that extra bit of security. The jar is plastic and the lid has a metal-ish feel to it. Even though it is plastic, it doesn't feel cheap at all and has a good weight to it.

Claims~ (off the box)
 (Tightens pores + Removes sebum + Exfoliates dead skin cells + Offers deep cleansing + Enhances skin tone + Provides cooling effects) This clay mask with it's super volcanic cluster capsules powerfully absorbs sebum to intensively resolve pore concerns.

Product~ 
     The mask itself is gray and feels pretty creamy when you scoop it out, but when you go to apply it, it can tug on dry skin, so I like to wet my face a little before spreading it over my face. I think the texture is really nice for this mask and it dries really fast. In about 4 minutes my face feels almost 100% dry. You know how when you wear masks and they make your skin feel heavy, this one isn't like. It also feels really nice and like it is cleaning out your pores with the really nice cooling sensation. 

Ingredients~ off the box
Water, Titanium Dioxide, Butylene Glycol, Volcanic Ash, Glycerin, Silica, Trehalose, Kaolin, Bentonite, Polyvinyl Alcohol, Caprylic/ Capric Triglyceride, Zinc Oxide, Glyceryl Stearate, Cetearyl Alcohol, Juglans Regia (Walnut) Shell Powder, Camellia Sinensis Leaf Extract, Citrus Unshiu Peel Extract, Opuntia Coccinellidae Fruit Extract, Orchid Extract, Camellia Japonica Leaf Extract, PVP, PEG-100 Stearate, Polysorbate 60, Stearic Acid, Palmitic Acid, Hydrogenated Vegetable Oil, Xanthan Gum, Iron Oxides, Zea Mays (Corn) Starch, Sorbitan Stearate, Polyacrylate-13, Mannitol, Microcrystalline Cellulose, Lactic Acid, Polyisobutene, Menthoxypropanediol, Ethylhexyl Glycerin, Tetrasodium Pyrophosphate, Polysorbate-20,  Iron Oxides (Cl 77491), Disodium EDTA, Phenoxyethanol. 

Directions~ (off the box)
     After cleansing, apply skin toner to refine skin texture and gently smooth over entire face, avoiding the eye and lip area. After 10 minutes, gently roll, using fingertips to rinse off with lukewarm water.

Scent~
    This mask really doesn't smell like much. It has a slight minty hint to it, but other than that, its your basic clay mask scent. I guess it could have an earthy scent to it? if that makes sense. It should since this product is basically dirt........ or clay seeing how it's clay and all. Anyway, no specifically strong are potent scent, which is great for those of you out there that have sensitive noses.

Before/ After~

Conclusion~
     As you can see from the picture above, there is a lot less sebum and my pores look a bit smaller after the treatment. My skin looks a lot less redder and my complexion looks a lot better. This mask has become one of my new favorites because it's really good at clearing my acne as well as making my pores look and feel 100x better. There are two different versions of this mask, the original, which is better for more sensitive and drier skin types, and this one which is for more oily and acne prone skin tones. Usually I have a really good skin day the next day (since I usually use this at night), because it really clears up my skin. 

Pros~
No Strong Scent
Clears Up Skin
Makes Pores Feel Clean
Shrinks Pores
Delivers Claims
Reduces Oil
Nice Packaging

Cons~
A little dry at first
Lots of Stearates and Acids in the Ingredients

Overall Rating~ 5/5
     Since there are definitely more pros than cons, and it clears up my skin a lot, it gets a perfect score in my book. I've been using it for about 3 weeks now and I've seen major improvement with my skin. 

    I hope you all enjoyed this review and that it helped to give you more information about this mask. I know that when I'm about to buy a product, I like to read a lot of reviews on it to see what's up, so if that's your case in reading this post, I really encourage you to get it! If you do have drier skin though, I would say that you should use the original formula. My sister Anna uses the original one (she has dry and sensitive skin), and loves it, so choose depending on your skin type. Anyway, I will see you guys on Monday, on my YouTube channel with a homecoming makeup tutorial! Love ya'll, Muah!!
Grace


~Song of this post~


Sunday, September 28, 2014

Orange Caramel 'My Copycat' Nana Makeup Tutorial


Sup!
     This is going to be the last Kpop tutorial for awhile. It's all I've been posting for the past month, and thats because, I've been trying to catch up with all the new releases and stuff. Anyway, today I have an Orange Caramel tutorial based on Nana's look in My Copycat, which is a really fun concept for a music video. Not to toot my own horn or anything, but I was boss at that I Spy game so *toot toot!*. But for serious, here is my last Kpop tutorial for while, so shall we hop right on into it?

~Face~

1. Prime
     First thing I'm going to do, is prime my face with the Dr. Young Anti-Pore primer and apply that to my t-zone since that's where my pores are the largest and need the most TLC. I applied this with my fingers and patted it into my pore.

2. Conceal
     Since my dark circles have gotten progressively worse, what with the school year starting back up, I decided to conceal them with the Skinfood Rice Pen Concealer to my under eye area in a triangle shape, and blended it out with a sponge.

3. Base
     To give my skin a dewy type finish, I applied the Shiseido Sheer and Perfect Foundation all over my face with my fingertips. If you use your fingers, it will help the foundation warm and oxidize to your skintone better.

4. Set
     To set all of the hard work we just did, I'm using the Maybelline Fit Me Pressed Powder and dusting it across my face with a fluffy brush. I like to apply  a bit more pressure to where I applied concealer to give it a long lasting, budge proof finish.

~Eyes~

1. Prime
     For a base, I applied NYX Jumbo Eye Pencil in Cashmere all over my lid, up to my crease line and blended it out with my ring finger.

2. Base
    I know, yellow eyeshadow. Normally a big no no, but it actually end up working pretty well for this look. I'm using the BH Cosmetics 180 Colors palette which has really just been collecting dust for the past couple years since the color aren't really wearable for everyday, ya know? But I did find a really nice yellow for this look.

3. Under Eye Line
     Okay, so I'm using the Hard Candy So Baked Bronzer in Tropics on the under eye line up into the inner corner of the eye and blending it out with an angled brush. This gives the look more of a sultry kind of feel. Kinda.

4. Line
     On the top lash line, I applied a thin strip of ELF Liquid Eyeliner in Black as close to the lash line as possible.

5. Mascara
     On my lashes I applied a coat of the Nature Republic So Big Curling mascara. I didn't curl them this time because I wanted them to have a really bold look.

~Cheeks & Lips~

1. Blusher
     For the cheeks, I applied The Face Shop Peach Cushion Blusher on the apples of my cheeks, as well as the outer portions of my face to give everything a peachy glow.

2. Lips
    Lastly, for the lips, I mixed together the Elle Girl Tint Gloss in Rock Berry with the Revlon Colorburst Lip Butter in Tutti Fruitti, and applied it all over my lips with my finger tips.

~Finished Look~

     That's it for now! I hope that you guys enjoyed this tutorial, if you did be sure to check out the rest of my KPop tutorials on my blog as well as on my YouTube channel. As always if you have any requests or questions, leave me them in the comments and I'll get to them ASAP. Love ya'll, Muah!
Grace ^.^


Song of this post~

Saturday, September 20, 2014

Girl's Day 'Darling' Hyeri Makeup Tutorial


Hey All!
    It's been a bit since I've blogged, but I've been trying to get back into the swing of things. I've had two Cross Country meets this week, as well as catching up on school that I missed, since I was on vacation last week, and getting back into the school flow. I've had the pictures for this post ready for about two weeks now, and just was feeling really uninspired. But today, I decided that I wanted to blog. As you can see by the title, today's look is based of of Hyeri from Girl's Day in their most recent music video, Darling. The song is an addiction. Whenever I just need a mood booster, I play it and I'm instantly happier. So let's get this tutorial started, shall we?

~Face~

1. Prime
    I haven't used this primer in FOREVER! I remember thinking to myself that I didn't want to use it too often because it is so good, and I don't want to waste it at all. But on this day, I wanted to see if I still liked it, and no surprise, its just as good as I remember it. Super moisturizing and soothing to the skin, Etude House Goodbye Pore Ever Primer Essence is the perfect base to get Hyeri's luminous, porcelain skin.

2. Base
    I'm using the Etude House Precious Mineral Cotton Fit BB Cream to give my skin a flawless, brightened complexion. I dotted it on my face and blended it in with either a beauty blender or my fingers. I honestly don't remember, but I probably blended it out even more afterwards with a fluffy brush.

3. Conceal
     This is my favorite concealer trick that helps to brighten and conceal my raccoon like dark circles. It's super simple to do as well. Take your favorite under eye concealer (mine is the Skinfood Salmon Dark Circle Concealer Cream) with a liquid highlighter (I'm using the Face Shop High Lighter Beam). Apply the combo onto you under eye area in a triangle shape. I blended it out with a beauty blender type sponge. Voila! 

4. Set
     I didn't realize how cheesy this picture was until just now.....sigh, so embarrassing. Anyway, I set my face with a the Maybelline Fit Me Pressed Powder with a fluffy brush, after patting my face with my finger tips to get it to oxidize better.

~Eyes~

5. Brow
     If you're a regular on my blog, you know my brow routine like the back of your hand. However, if you're a newbie , I honestly, don't use any other brow product because it's perfect for my brows. I use the Etude House Perfect Brow Kit and an angled brush and go through my eyebrows with it. I like to take a spoolie and go through my brows afterwards to make them more natural.

6. Base
    All I'm doing here, is applying M.A.C's Soba all over my lid with a fluffy brush and also dragged it onto my lower lash line to tie everything together. Make sure to really blend the edges to keep this look from being too harsh.

7. Aegyo-Sal
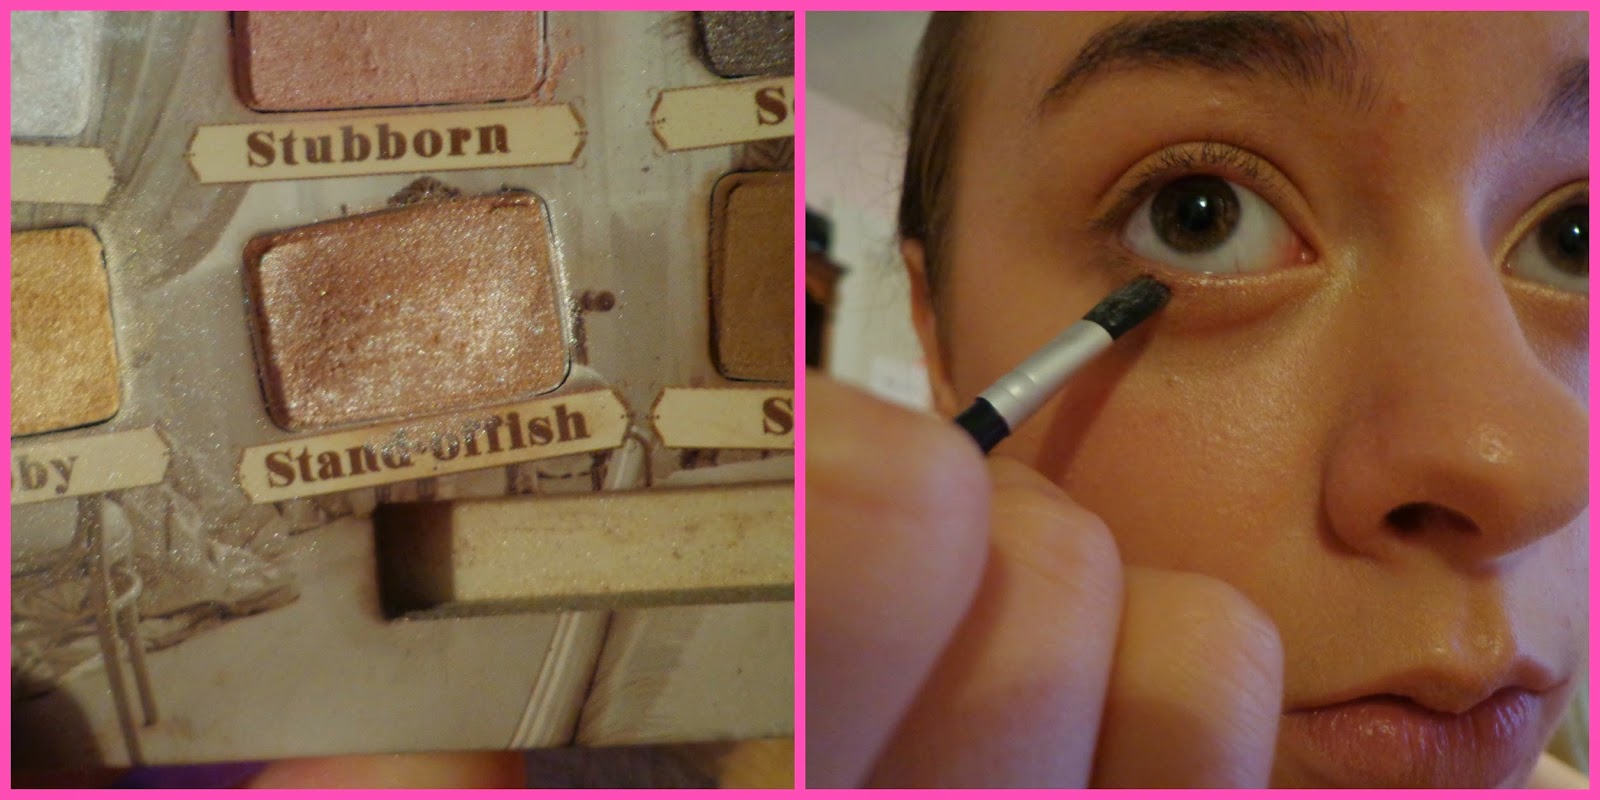
    For all of my reader who don't know Korean, an aegyo-sal is the puffy part right underneath your eye. Most Korean girls like to define this, because it makes their eyes cuter. Hyeri has some aegyo-sal action happening in this look, so taking the Balm Stand-offish, I'm just applying it thickly on my aegyo-sal line. 

8. Liner
    So, in my mind, it looked like Hyeri had a slightly purplish tint to her liner, so I used the Pixi Endless Silky Eye Pen in Deep Plum on my tight line. To take it up onto the upper lash line, you can either take a Q-Tip or an angled brush and smudge it out.

9. Lash
    Ya'll know the drill, curl your lashes and apply a good coat of volumizing mascara. I'm using the Covergirl Lashblast Luxe to give some glam to my eyes.

~Lips~

10. Stick
     Take any blueish pink lipstick and apply it all over your lips. Hyeri's is a bit more purple than the one I'm using, which is the NYX lipstick in Hot Pink. However, if you have a bit of a cooler toned lipstick in this shade range, you're good to go.

~Finished Look~

   ~
    I hope you all enjoyed this look. It certainly took me long enough to get to it, but hey, it's here now. If you did enjoy it, make sure to +1 this look, or tell me in the comments about tutorials you'd like to see or reviews or questions. Also, I plan on uploading a video this monday on my YouTube, so keep your eyes on the look out for that. Love ya! Muah!
Gracie ^.^


Song of this post~