Wednesday, January 30, 2013

Valentine's Day Tutorial

Ahnyoung! So i have been loving vintage inspired looks and Valentine's day is perfect for getting in touch with your vintage side. Hello 1940's! One of my favorite actresses Lauren Conrad is also really into vintage looks, and her beauty book has helped me to develop a better sense for that particular time frame. So without further ado, here is the tutorial (:
FACE:

Step 1: Apply a BB cream to your face for a natural amount of coverage. Did you know that BB creams were originally made in Germany? True story :) Here I'm using the L'Oreal Paris Magic Skin Beautifier BB. it has a almost sandy texture and comes out white, but the little beads burst and give you color. I like to apply it with my fingers, the best tool!

Step 2:  Take a concealer and apply wherever you need it. Always remember that although concealer is nice, too much can make your face cakey, so go as light as possible here. I like the DermaBlend Professional Cover Creme. It has a nice texture and applies very natural.

Step 3: Setting the face is super important in this tutorial, not only so that your face will be matte but because this look can be thrown off with too dewy of a face. I'm using the Maybelline Fit me! pressed powder in 110. Its perfect for setting all makeup because its basically translucent.

Step 4: Taking my Milani Berry Amore baked blush and an angled kabuki by Ecotools, apply to the hollows of your cheeks and the temples. What helps me to tone down the shade of this blush is taping off the excess on the brush.

EYES:

Step 1: Apply a translucent  eye primer over your whole lid making sure you get into the inner corner as well. Here I'm using the E.L.F. Eyelid Primer. Not only is it inexpensive but it works almost as good as the Urban Decay Primer Potion.

Step 2: Next take a darker brown shade and apply to your eyelid until you reach the crease of your eyelid. I'm using a brown shade from the Almay Eye shadow Trio for Hazel Eyes.

Step 3: Nest take a light champagne like pink and apply it to your inner corners with an angled eyeliner brush. This will help to bring out green eyes, and also brighten any eye color as well.

Step 4: Taking a light champagne color, apply it to your brow bone and blend out any harsh lines from the brown.

Step 5: Next apply a white eyeliner to your waterline to open up your eyes. I'm using the NYX Jumbo Eye Pencil in Cottage Cheese because its a beautiful pearly shade. Blend it out slightly with your fingers so it's not as harsh.

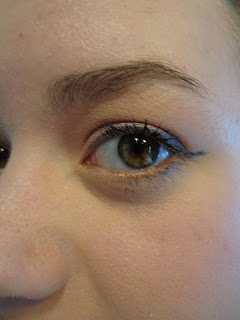
Step 6: Tight line your lashes with a black eyeliner. I'm using  the Urban Decay 24/7 Glide-on Eye Pencil in Zero. It goes on so smoothly  which helps with application.

Step 7: Create a small wing with a black liquid eyeliner. I'm using the E.L.F. Liquid Eyeliner in Black. It comes on nicely and its great for beginners.

Step 8: Curl your lashes and apply your favorite black mascara. I'm using the Maybelline Mega Plush Volume Express Mascara on my top lashes and the CoverGirl nature luxe mascara to my lower lashes in Brown.

LIPS:

Step 1: Apply a tinted lip balm that has a red tone to it. I'm using the Maybelline Baby Lips Lip Balm in Cherry Me.

Step 2: Apply your favorite red lipstick. Here I'm using the Clinique lipstick in Rosette (or Rosetta the label kinda started to tear off so its  hard to read (; )
FINAL RESULT
                                     :


      Well I hope you all enjoyed this makeup tutorial! Have a great Valentines day and remember that your prettiest accessory is your smile. Smile On,
Gracie


Monday, January 28, 2013

D.I.Y. Lip Scrub

     Ahnyounghaseyo! Today I'm going to show you how to make a lip scrub that is perfect for keeping your lips soft and supple. For the past couple of weeks, my lips have been getting really chapped because of all the cold weather. I hate wearing lipstick when my lips are chapped so I decided to make my own lip scrub.
First of before we get into the steps, here is the lip scrub recipe:

You'll need:
3 tablespoons of white sugar             2 tablespoons of extra virgin olive oil    
1 teaspoon of Vanilla Extract            a dash of Pumpkin Spice seasoning (optional)

Directions: Mix all the ingredients together and store in a air tight container.

     Now lets get into the tutorial (:


                                                                     Step 1:
Apply a thick amount of your favorite lip balm. I'm using Burt's Bees Replenishing Lip Balm with Pomegranate oil. It makes your lips feel really moisturized.
                                     
                                                                   Step 2:
Wet a washcloth with hot water. Set it over top of your lips and let it steam over top for about a minute or until the washcloth becomes cold. The steam will help the lip balm to really sink into your lips giving it extra moisture.

                                                                 Step 3:

Next take a worn out tooth brush (cleaned of course) and scrub your lips. Make sure that you get all the chapped spots really good. Take the washcloth and remove excess lip balm that was previously on lips.

                                                                  Step 4:
Apply honey to your lips and let it sit for 10 minutes. Honey is very moisturizing so this is like a mask for your lips.
       
                                                                         Step 5:
Take that lip scrub from earlier and apply and rub into your lips for about 3-5 minutes. Clean lips off with the washcloth and apply a lip balm.

                                                           The End Results:

     Your lips should feel AMAZING right now! This is my favorite thing for my lips and i had to share it. I like to use this 3 times a week to keep chapped lips at bay. As long as you keep applying lip balm, your lips will stay soft and supple with this lip scrub. Enjoy!

Gracie


Wednesday, January 23, 2013

Valentine's Day Touch of Pink Makeup Tutorial

     Valentine's Day is right around the corner, so I decided to create this easy tutorial. I used a combination of pink and neutral shades to create a perfectly wearable look. Without further ado, lets get started!  

     Step 1: Its really important to moisturize your skin before applying any makeup. I like to use the Clean&Clear Dual Action moisturizer so that it can help me with any breakouts. Don' forget to also moisturize your lips. I like Burt's Bees for this, but of course you can use what ever works best for you.


Step 2: Apply a concealer where its needed. To keep the look from getting too cakey i decided to skip foundation, but you can choose whatever works best with you. I'm using the DermaBlend Cover Creme in True Beige.

EYES:
Step 3: Apply a champagne eye primer over your whole lid. I love the Urban Decay Primer Potion in Sin for the primer. It gives a really nice glow to your eyes, perfect for this look!

Step 4: Apply a Light pink eye pencil  to the outer 3/4 of your eyelid only going as far as the crease. Make sure the inner fourth of your eye is still clean. I'm using the NYX Jumbo Eye Pencil in Strawberry Milk.

Step 5: For all of the eye shadow I'm using the Sleek Cosmetics Oh So Special Palette. It has the perfect colors for this look. I'll put a link at the end of this post so you can know where to purchase this product. Apply a shimmery burnt pink over top of the eye pencil and bring it up to the crease. Still keep that inner fourth clean of all eye makeup. I'm using Organza from the Oh So Special palette.


Step 6: Apply a taupe/burnt brown into the crease. The crease color should go into the inner corner of your eye, but there should still me a clean spot as well. I'm using The Mail from the palette.


Step 7: Taking a matte vanilla shade, apply to your inner corner and brow bone. For the inner corner you can now fill in that clean space with this shade, blending the pink slightly to make the lines softer. I'm using Bow from the same palette.

Step 8: With an angled brush, apply a dark brown shimmery shade to the outer half of you lower lash line. If your worried about specks getting into your eye, you can choose to wet the brush. I'm using All Wrapped Up.

Step 9: To avoid fall out underneath your eye, take an under eye concealer and apply  and blend lightly with your fourth finger.

Step 9: Tight Line your upper lash line with a dark brown eye liner. I'm using a NYX Jumbo Eye Pencil in Dark Brown.

Step 10: Apply a light gold eye liner onto the inner half of your lower lash line. I really like this touch because it adds some warmth to your look. I'm using the NYX Jumbo Eye Pencil in Cashmere.
 Step 11: Apply a liquid eyeliner to your top lash line. You can opt to do a small wing if you want to add a touch of vintage. Once your done curl and apply mascara to you top and bottom lashes.
 The finished product will look like this:


FACE:

Step 1: Apply a natural blush shade to the apples of your cheeks and blend out. The natural pink will make a really nice touch to the whole look without stealing attention from the eyes.I'm using NYX Blush in Pinched.

Step 2: Apple a highlighter to the high points of your face. The high points are the parts of your face that are pushed forward slightly. I'm using the Philosophy Color of Grace Shimmering Face Powder.


Step 3: Apply a translucent powder all over your face and eyes to set everything and to keep it in place all day. I'm using the Maybelline Fit Me Pressed Powder in 110.

LIPS:

Step 1: Line your lips with a nude pink lip liner. I'm using the NYX Jumbo Lip Pencil in Pink Nude.

  Step 2: Fill your lips in with a light frosty pink shade. I'm using the NYX Lip Smacking Fun Colors in Sash.
 Step 3: Apply a rosey lipstick over top and blend your lips together. I'm using the Rimmel Moisture Renew Lipstick in Rose Shimmer.

Your lips are all done now. They should look somewhat like this:


     Okay that's it for this look! I really hope you guys enjoy this look. Here is the finished look all together:


     I hope you all enjoyed this tutorial. I hope your Valentine's Day is wonderful and that you meet your prince charming (: Until next time,
Gracie


the link for the Sleek Palette: http://www.sleekmakeup.com/eyes/shadows/i-divine